Exporting
Note
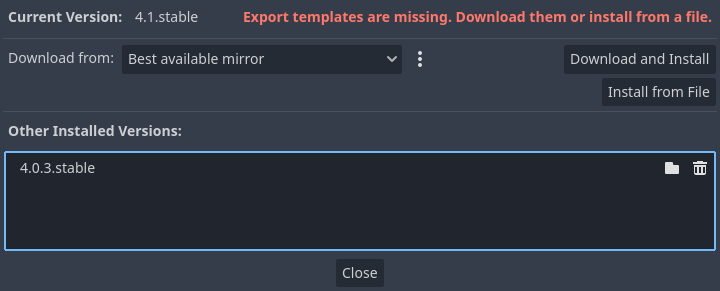
In order for your exported game to work, you need our custom export templates. Download them from the corresponding GitHub release.
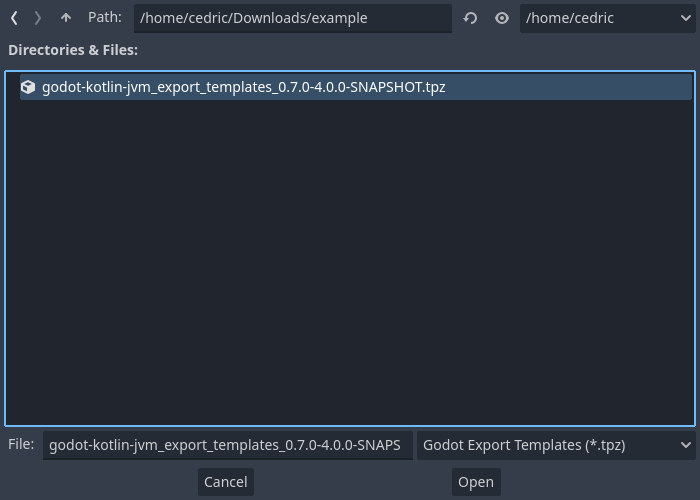
To export your game, you need to add our export templates to Godot. After you've downloaded them, open the export template manager in Godot and select Install from File:
After the export templates have been added, you can export your game. Your game jar will be included in pck.
On desktop platforms, this also copies the JRE folder of your project in the exported game folder.
Warning
The official export templates from Godot will not work! You have to use our export templates or build your own! Note that because this is not an official build, the template manager will fail to find a link to our templates and display a warning. You can simply ignore it. Downloading our templates from the Godot editor is currently not possible, we opened a proposal for it.
Requirements
To export your game, you need to have an embedded JRE created. Run the following command within your project's root.
- amd64 systems:
1jlink --add-modules java.base,java.logging --output jvm/jre-amd64-linux - arm64 systems:
1jlink --add-modules java.base,java.logging --output jvm/jre-arm64-macos
Info
As the jre is platform dependent, you need to create a jre for each platform. Adjust the above command on a per-platform basis:
- For Linux: jvm/jre-amd64-linux
- For Windows: jvm/jre-amd64-windows
- For MacOS:
- jvm/jre-amd64-macos
- jvm/jre-arm64-macos
- For iOS and Android, no embedded JRE is needed
The above command will create a very minimal JVM, if you need extra features you can include the following modules:
jdk.jdwp.agentto enable remote debuggingjdk.management.agentto enable JMX.
Special note for MacOS: To create a universal app, you'll need both amd64 and arm64 JRE. You can create an amd64 JRE
by using jlink with rosetta and an amd64 JDK on an arm64 MacOS.
Warning
For desktop exports you need to make exports based on the platform you're on, as exporting will copy the generated jre folder to your export. An MacOS JRE will not work on Windows, so you'll need a Windows host to export for Windows.
Alternatively we provide a configurable gradle task which generates the JRE for your current host OS:
./gradlew generateEmbeddedJre
The task can be configured like so:
1 2 3 4 5 6 7 8 9 10 11 12 13 | |
Specifics
godot-bootstrap.jar and main.jar are copied into pck during the export process.
As a real file path is needed to handle them, they are copied on the first game version start
from res:// to user:// (we check if they exist and also check the md5 hash) to only update when needed.
Don't forget to remove them when writing an uninstaller for your game.
Android
Warning
If you plan to export your game to android, make sure the libraries you use, are actually compatible with android.
In order to build for Android, use the dedicated buildAndroid or buildAndroidRelease Gradle task.
1 2 3 4 | |
On Android, we do not embed a JVM, we use the existing VM provided by the OS. In order for your game to load the necessary JAR files,
they need to be converted into .dex format. Our Gradle plugin will handle this for you but it requires that you have the android build tools installed (you can easily install and update them with the SDK manager in Android Studio or by installing the Android plugin in Intellij and using the SDK manager there).
Warning
Ensure you have the build tools version 35 or newer installed!
Configuration
While our gradle plugin is able to automatically find the newest installed build tools (if the env variable ANDROID_SDK_ROOT is properly set), it sometimes is required to manually set the build tools version. This can be done optionally like so:
-
Setting the
d8tool:1 2 3
godot { d8ToolPath.set(File("${System.getenv("ANDROID_SDK_ROOT")}/build-tools/36.0.0/d8")) } -
Setting the
androidCompileSdkDirectoryto your target SDK version (most of the time, you want to set it to the newest version available):1 2 3
godot { androidCompileSdkDirectory.set(File("${System.getenv("ANDROID_SDK_ROOT")}/platforms/android-36")) } -
Setting the
androidMinApiLevel(equivalent to the--min-apiargument ofd8), default is21:1 2 3
godot { androidMinApiLevel.set(22) }
Danger
Similar to the desktop targets, the game copies the needed jar files to the user:// directory upon first execution or if the files have changed. On Android this is the applications files folder. If you do IO operations on Android, never empty the whole files folder! Only delete what you have added or exclude the following two files when clearing the files folder: godot-bootstrap-dex.jar and main-dex.jar.
GraalVM Native Image
Warning
GraalVM Native Image is an advanced feature and requires a lot of work to support. Especially if you rely on many third party libraries.
In order to build for graalvm, configure graalVmHomeDirectory and then use buildGraalNativeImage or buildGraalNativeImageRelease. See the GraalVM native-image section in advanced user guide.
The main.jar and godot-bootstrap.jar are compiled into a single usercode shared library is copied into pck during the export process. Similar to the regular export versions, the usercode shared library is copied to the user:// dir. Don't forget to delete it when creating an uninstaller.
On desktop, you can add the feature export-graal-native-image to make your game run on GraalVM Native Image.
You can also use export-all-jvm to export both the JVM and the Native Image. By default, your export will use the same mode as the one used by the editor that exported it, but you can easily override this by using a command-line argument when launching.
iOS
Warning
With this export you don't have a choice regarding JVM version you use. Please use GraalVM 23.1.3.
Additionally, to the regular GraalVM configuration mentioned above, add the following in build.gradle.kts, then invoke buildIOS or buildIOSRelease:
1 2 3 | |